


Buttermilk Brined Roasted Chicken
- ruehite
- Dec 22, 2025
- 8 min read
The Recipe That Started It All (And How to Make It Your Own)

I was nine years old when I cooked my first whole chicken.
My mom was out of town, and I decided - with all the confidence of a kid who'd been helping in the kitchen since age six - that I was going to roast a whole chicken.
Not chicken pieces. Not a simple pan-fried breast. A whole bird, just like you'd cook a turkey, because that seemed impressive and cool.
Somehow, miraculously, it turned out pretty well. That chicken sparked something in me that's never gone away: an absolute passion for cooking.
How This Recipe Became My Tradition
A few years ago, a friend heard me mention I was going to roast a chicken for Christmas instead of making a whole turkey (because honestly, who needs that much turkey for a small gathering?).
She immediately sent me a recipe from Samin Nosrat's "Salt Fat Acid Heat" for buttermilk-marinated roast chicken. "You HAVE to try this," she said.
I did. And it was incredible.
That buttermilk brine creates the juiciest, most flavorful chicken you can imagine. The acidity tenderizes the meat while the buttermilk keeps everything moist.
I've been making some version of this chicken for the last 3 or 4 Christmases, and now it's become part of my Sunday Roast repertoire too.

But here's the thing - while I always use that brilliant buttermilk brining technique from Samin's recipe, I never season it the same way twice.
Sometimes, I embrace the holiday spirit by stuffing herbs into the cavity, much like preparing a turkey. Other times, I opt for a Mediterranean twist with lemon and oregano.
Occasionally, I experiment with bold Peruvian spices or Asian flavors.
The brine serves as your base. The seasoning is where you can showcase your creativity.
Why Buttermilk Brining Works (The Science!)
Before we get to the recipe, let's talk about why this technique is so brilliant:
Buttermilk is acidic - The lactic acid gently breaks down proteins in the chicken, making it incredibly tender, which means, even if you don't eat breast meat... you'll eat the breast meat.
It's got fat - The fat in buttermilk helps carry flavor and keeps the meat moist during cooking.
It creates a barrier - The buttermilk coating helps the chicken retain moisture while developing a beautiful golden skin.
Salt penetrates deeply - When you salt the buttermilk brine, that salt has time (12-48 hours) to work its way deep into the meat, seasoning it from the inside out.
The result? Chicken that's juicy throughout, deeply seasoned, with crispy golden skin. Every. Single. Time.
Prep Time: 15 minutes (plus 12-48 hours brining)
Cook Time: 1 hour 15 minutes
Total Time: 1 hour 30 minutes (plus brining time)
Serves: 4-6
Ingredients
For the Buttermilk Brine
1 whole chicken (4-5 lbs)
2 cups buttermilk
2 tablespoons kosher or Pink Himalayan Sea salt
For My Sunday Roast Seasoning (Turkey-Style)
3 tablespoons olive oil or melted butter
1 tablespoon dried oregano
1 tablespoon dried basil
1 tablespoon garlic powder
1 tablespoon onion powder
1 tablespoon Trader Joe's Everyday Seasoning (or your favorite all-purpose blend)
2 teaspoons pink Himalayan salt (or kosher salt)
1 tablespoon black pepper
Fresh herbs for stuffing: 4-5 sprigs fresh thyme, 3-4 sprigs fresh rosemary
1 lemon, halved
1 onion, cut in thick rings
2 stalks of celery chopped into about 6 pieces
4-5 cloves garlic, peeled
Instructions
Step 1: Brine the Chicken (12-48 Hours Before Cooking)
Remove any giblets from the chicken cavity. Pat the chicken dry with paper towels.
In a large bowl or container, mix the buttermilk, and salt. Place the chicken in the buttermilk mixture, making sure it's well coated. If the chicken isn't fully submerged, you can add a bit more buttermilk or flip it halfway through brining.
Cover and refrigerate for at least 12 hours, but ideally 24-48 hours. The longer it brines, the more flavorful and tender it becomes.
Pro tip: I like to put the chicken and buttermilk in a large zip-top bag, press out the air, and seal it. This uses less buttermilk and ensures even coverage.
Step 2: Prep the Chicken for Roasting
Take the chicken out of the refrigerator 1 hour before roasting - you want it at room temperature for even cooking.
Remove the chicken from the buttermilk and let the excess drip off. Pat it VERY dry with paper towels - this is crucial for crispy skin. Don't rinse it! That buttermilk coating is flavor.
Preheat your oven to 425°F (220°C).
Step 3: Season Like You Mean It
In a small bowl, mix together the oregano, basil, garlic powder, onion powder, Everyday Seasoning, salt, and pepper.
Rub the chicken all over with olive oil or melted butter
Season the chicken generously inside and out with your spice mixture. I use my hands and really massage it into every crevice. Don't be shy - this is how you build flavor!
Step 4: Stuff the Cavity
Stuff the cavity with the fresh thyme, rosemary, lemon halves, and garlic cloves. This isn't for eating - it's aromatics that will steam from the inside, flavoring the meat as it cooks.
Tie the legs together with kitchen twine if you have it (helps with even cooking), and add foil onto the wing tips so they don't burn (don't waste your wings by cutting them off.
Step 5: Roast to Golden Perfection
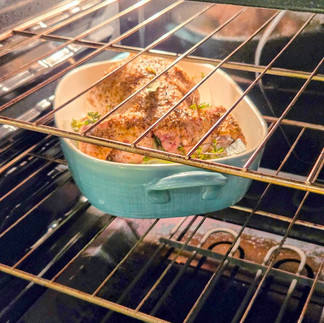
Place the chicken breast-side down on a roasting rack in a roasting pan (or on a bed of vegetables if you don't have a rack - carrots, onions, and potatoes work great, see image below).
Position the chicken in one corner of the oven with the legs facing the back for the initial half of the cooking time. Then move it to the opposite side. This ensures the chicken cooks evenly throughout.
Roast at 425°F for 15 minutes to get that initial browning, then reduce the heat to 375°F (190°C) and continue roasting for about 50-60 minutes more.
How to know it's done:
Internal temperature in the thickest part of the thigh should read 165°F
Juices run clear when you pierce the thigh
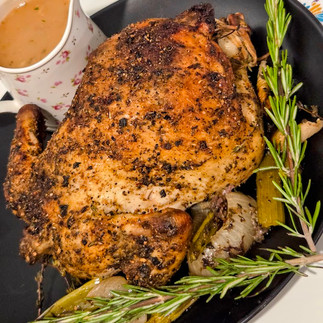
The skin is golden brown and crispy
The legs wiggle easily in their sockets
Timing note: Figure about 15-20 minutes per pound at 375°F after the initial high-heat blast.
Step 6: Rest and Serve
This is THE MOST IMPORTANT STEP. Remove the chicken from the oven and tent it loosely with foil. Let it rest for 15-20 minutes before carving.
During this time, the juices redistribute throughout the meat, making every bite incredibly moist. If you cut into it immediately, all those juices run out onto your cutting board instead of staying in the meat.
While the chicken rests, use those pan drippings to make gravy!
Carve and serve alongside crispy roasted potatoes, Yorkshire puddings, roasted root vegetables, and all the fixings for your Sunday roast.


Make It Your Own: Flavor Variations
This is where cooking gets fun. The buttermilk brine stays the same - that's your foundation for juicy, tender chicken. But the seasoning? That's where you get creative. Here are some of my favorite ways to take this chicken in completely different directions:
Mediterranean Lemon Herb
Perfect for: Spring and summer dinners, lighter meals, Greek-inspired menus
Seasoning:
3 tablespoons olive oil
Zest of 2 lemons
3 tablespoons fresh oregano, chopped
2 tablespoons fresh thyme
6 cloves garlic, minced
Salt and pepper
Stuff cavity with: Lemon halves, fresh oregano, garlic cloves
Serve with: Greek salad, roasted potatoes with lemon, tzatziki
Peruvian-Inspired
Perfect for: Bold, exciting dinners, Latin-inspired menus, summer grilling season
Seasoning:
3 tablespoons olive oil
2 tablespoons aji amarillo paste (or 1 tablespoon paprika + 1 teaspoon cayenne)
2 teaspoons cumin
2 teaspoons coriander
4 cloves garlic, minced
Juice and zest of 2 limes
Salt and pepper
Fresh cilantro
Stuff cavity with: Lime halves, cilantro stems, garlic
Serve with: Cilantro lime rice, black beans, aji verde sauce
Spicy-Sweet BBQ Style
Perfect for: Casual dinners, cookouts, comfort food cravings
Seasoning:
2 tablespoons olive oil
2 tablespoons honey
1 tablespoon chipotle powder (or smoked paprika for less heat)
2 teaspoons cumin
2 teaspoons garlic powder
1 teaspoon onion powder
Juice of 1 lime
Salt and pepper
Stuff cavity with: Lime halves, jalapeños, garlic
Serve with: Coleslaw, cornbread, baked beans
And then... well you get the point. The possibilities are endless!


Chef's Tips for Perfect Roasted Chicken
Dry That Skin: The #1 secret to crispy skin is making sure the chicken is completely dry before it goes in the oven. Pat it dry thoroughly after brining.
Room Temperature Matters: A cold chicken from the fridge will cook unevenly. Let it sit out for an hour before roasting.
High Heat Start: That initial 425°F blast helps crisp the skin. Then lower heat finishes cooking the inside without burning the outside.
Don't Skip the Rest: Seriously. 15-20 minutes of resting is non-negotiable for juicy chicken.
Use a Meat Thermometer: It's the only way to know for sure when it's done. 165°F in the thigh, and you're golden.
Save Those Drippings: The pan drippings are GOLD for gravy. Don't waste them!
Season Generously: Chicken can handle a lot of seasoning. Don't be timid. This is where bold, Southern-style cooking comes in - we season with confidence! Keep in mind that the chicken has already been brined with salt, so consider this when seasoning it.


The Philosophy: Cooking with Creativity and Confidence
Here's what I want you to take away from this recipe: cooking is not about perfection or following rules exactly. It's about understanding techniques and then making them your own.
The buttermilk brine? That's a technique. It works because of science - acid, fat, salt, time.
Do that part right, and you've got the foundation for incredible chicken.
The seasoning? That's creativity. That's YOU. That's where you think about what flavors you love, what cuisine you're craving, what you have in your spice cabinet, or what you discovered on your last trip somewhere amazing.
My mom didn't teach me to cook by handing me a bunch of recipes to follow precisely. She taught me to understand food - to taste, to adjust, to experiment.
When I cook, I follow my palate. it isn't about copying - it's about understanding what makes something delicious and then making it yours.
That's what I want for you. Use this recipe as a starting point. Try my Sunday roast version.
Then try one of the variations. Then create your own. Trust your palate. Season to suit you. Make it yours.
Make-Ahead & Storage
Brining: This MUST be done 12-48 hours ahead. I usually start my brine 24-36 hours before I plan to cook.
Seasoning: You can mix your spice blends up to a week ahead and store in airtight containers.
Cooked Chicken: Store leftovers in an airtight container in the fridge for up to 4 days. The meat is incredible in sandwiches, salads, soups, or just eaten cold straight from the fridge (don't judge me).
Reheating: Gently reheat in a 325°F oven covered with foil to prevent drying out.
Pairing with Sunday Roast
This chicken is the foundation of my Sunday roast, served alongside:
But it's also perfect for:
Christmas dinner (my tradition!)
Thanksgiving for smaller gatherings
Any Sunday family dinner
Meal prep for the week
Impressing dinner guests
From a Nine-Year-Old's First Chicken to Now
That first whole chicken I made at nine years old wasn't perfect but I remember my family being impressed.
It may have been over-seasoned in some places and under-seasoned in others. But it was mine. I made it happen.
And that confidence - that willingness to just try, to cook something ambitious, to trust myself - that's still how I approach cooking today.
Every time I roast a whole chicken, I think about that nine-year-old girl who thought roasting a whole bird seemed cool and impressive. She was right. It is cool. It's even cooler when you make it your own.
So here's my challenge to you: Make this chicken.
Follow the recipe the first time if you want. But then? Mix up those spices. Try a new herb combination.
Think about a restaurant dish you loved and try to capture those flavors. Be a recipe thief. Be creative. Cook with confidence.
Your nine-year-old self would be proud.
What was your first cooking memory? And what's your go-to way to season chicken? Let me know in the comments - I'm always looking for new flavor inspiration!
Want more recipes and stories from my travels? Subscribe to Rue's Global Kitchen and follow along as I bring gourmet home cooking from around the world to your table!


Comments